


Double Din Radio Dash Kit Wiring Harness For 2005-2007 Jeep Grand Cherokee***
Double Din Radio Dash Kit Wiring Harness For 2005-2007 Jeep Grand Cherokee
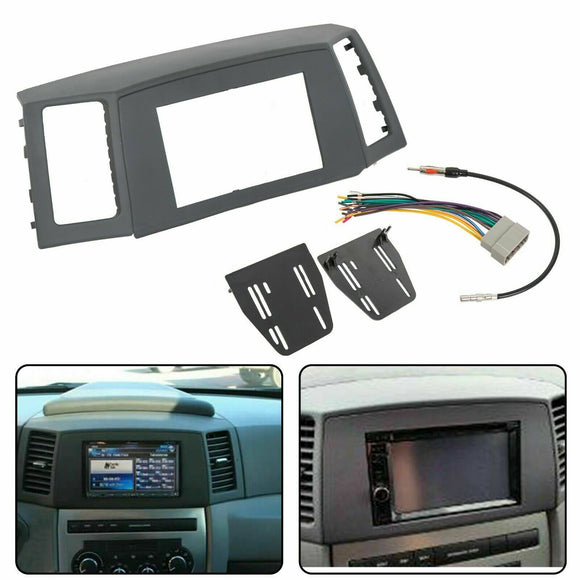
Description
Get a flawless fit and unifrom look at a great price! Don't hassle with customizing your factory bezel by cutting and fabricating it to fit your double din radio, we made this kit to avoid doing just that. We are the original manufacture of this product. We have been making this Kit long before Metra.
Fit
Fits 2005-2007 Jeep Grand Cherokee
Feature
- 100% brand new
- For the installation of an Aftermarket Radio
- Will convert factory radio opening to accommodate Double Din
- Update the look of your vehicle at a reasonable price
- Solid one piece construction
- High-Grade ABS Plastic
- Color: Grey
Note
- Wire Harness will not retain steering wheel controls.
- Wire harness is compatible with standard wiring only.
- Wire harness will not work for vehicles with Rear Tuners.
- Wire harenss will not work on models with Factory Infinity Systems, Boston Acoustic Systems.
- Wire harness is not compatible with CAN Bus Radios (models REF, REC, RAQ or RAK; The radio's name can be found on the face of the radio).
EIA Color Codes:
- Yellow – 12V Constant
- Red – 12V Accessory
- Black - Ground
- Black with White Stripe - Factory Amplifier Ground
- Blue - Power Antenna / Factory Amplifier Remote Turn On
- Blue with White Stripe - Factory Amplifier Remote Turn on
- Orange – Dash Light Dimmer/Illumination
- Orange with White Stripe - Dash Light Dimmer/Illumination
- Brown - Mute / Not Used
- Green – Left Rear Speaker (+)
- Green with Black Stripe Left Rear Speaker (-)
- White – Left Front Speaker (+)
- White with Black Stripe – Left Front Speaker (-)
- Purple – Right Rear Speaker (+)
- Purple with Black Stripe – Right Rear Speaker (-)
- Gray – Right Front Speaker (+)
- Gray with Black Stripe – Right Front Speaker (-)
Specification
Condition: Brand new
Color: Black
Material: Plastic
Packing list:
1 x Bezel
2 x Brackets
1 x Antenna Adapter
Standard Wiring Harness
Installation Directions:
Tools needed for install - Philips screw driver, Dremel (rotary tool) and a Soldering Iron. You can buy a Soldering gun at Harbor freight for as low as $3.99 and a Dremel (rotary tool) knock off for $10.79 or just look on eBay.
- Step 1: Gently pull on the factory bezel, it is only held on by a few plastic tabs up top and there are 2 clips on each side of the AC vents (totaling 4) and 1 clip at the bottom..
- Step 2: You will see 4 Philips screws holding the factory radio in place, remove the screws and the radio will be lose and ready to come out.. Keep the screw for installation of new double din radio.
- Step 3: Next unplug all the wire harness and antenna cable leading into the factory radio. You will now have the empty hole ready for new double din radio and your newly purchased dash kit.(DO NOT DISCARD THE FACTORY BEZEL AS YOU WILL NEED THE AC VENTS TO PUT ON THE NEW BEZEL)
- Step 4: The removal of the AC vents from the factory bezel.
- Step 5: Install the factory AC vents to the newly purchased aftermarket bezel. Please see video below.. Do this installation on a soft, clean, or protected surface as to not scratch the face or your new bezel....Note while installing AC vents to new bezel, apply firm pressure while melting down the tabs so the AC vents will be flush.
- Step 6: Screw the supplied brackets onto the side of your aftermarket double din radio ( using the supplied screw that came with the aftermarket radio)
- Step 7: Wire the aftermarket radio harness to the harness supplied using butt connectors or solder wiring together.
- Step 8: Plug in aftermarket radio harness to aftermarket radio & install harness to factory radio plug.
- Step 9: Connect antenna adapter to factory antenna end & aftermarket radio.
- Step 10: Using the same 4 screws you used to take out the factory radio, screw in your new double din radio.
- Step 11: Snap New dash bezel back into dash.Make sure radio looks even from side to side and top to bottom, should be a nice even fit all the way around. You may need to readjust the brackets slightly to make radio completely centered.
- Step 12: ENJOY YOUR NEWLY MOUNT RADIO AND BEZEL
Part #: ET-159